The journey from "hello world" to a real ML development workflow on NVIDIA's compact AI supercomputer
When my DGX Spark arrived, I did what any developer would do: I unboxed it, marveled at how something that looks like a piece of golden coral could house a petaflop of AI compute, went through the setup steps, and immediately SSH'd into it from my M2 Macbook Pro to see what it could do.
The initial experience was genuinely impressive. The DGX Dashboard at `localhost:11000` gave me real-time GPU metrics, memory utilization, and thermal stats. Within minutes, I had JupyterLab running and was playing with some basic "hello world" tests—serving an open-weights model locally using the pre-installed NVIDIA AI software stack. The 128GB of unified memory meant I could load models that would choke my MacBook, and the Blackwell GPU architecture delivered the throughput I expected.
But then reality set in. I wanted to build something real.
The Growing Pains of Local AI Development
After the initial honeymoon phase, I found myself repeatedly bumping into the same friction points:
SSH Fatigue: Every time I wanted to run something, I was tunneling ports, managing connections, and context-switching between my laptop and the Spark. The NVIDIA Sync app helped, but I still felt like I was operating two separate development environments rather than one cohesive workflow.
Experiment tracking pain: I started training models, tweaking hyperparameters, and running experiments. Within a week, my home directory was littered with `model_v1.pt`, `model_v2_final.pt`, `model_v2_final_FINAL.pt`. Sound familiar? I had no systematic way to track what inputs produced what outputs, or which experiment configuration led to that one good result I couldn't reproduce.
GPU Metric Black Holes: Sure, the DGX Dashboard showed me real-time GPU utilization, but I couldn't easily correlate those metrics with specific training runs. "Was that spike at 3 AM the good experiment or the bad one?"
Wasted Compute on Preprocessing: My data pipeline involved tokenization, feature extraction, and augmentation steps that took 20+ minutes. Every time I changed a downstream training parameter, I'd re-run the whole pipeline from scratch—burning GPU cycles on work I'd already done.
The Fear of Interruption: Training runs that took hours made me nervous. What if my SSH connection dropped? What if the Spark needed a reboot? I'd lose all progress and have to start from scratch.
These aren't unique problems—they're the classic challenges of ML development that platforms like Kubeflow, MLflow, and Airflow try to solve. But those tools felt heavyweight for a single DGX Spark sitting on my desk. I needed something that could give me production-grade workflow management without requiring a Kubernetes cluster to orchestrate.
As a core developer of Flyte 2, I’ve been so spoiled by it that I set out to install Flyte 2 on my DGX Spark box.
Enter Flyte 2: Pure Python ML Orchestration
Flyte is an open-source workflow orchestration platform that's been battle-tested at scale by companies like Spotify, Lyft, and Fidelity. But the recent Flyte 2 Devbox release reimagines how you write ML workflows in both the cloud and in a local home lab.
The old way (Flyte 1.x and most orchestrators) required you to learn a domain-specific language (DSL) with special decorators and constraints. Flyte 2 throws that out and lets you write pure Python:
No `@workflow` decorator. No Promise objects. No restrictions on Python constructs. Just... Python.
The `TaskEnvironment` encapsulates the context and resources for execution—in this case, requesting a GPU. When you call `flyte.run()`, Flyte handles spinning up containers, passing data between tasks, and managing the execution lifecycle.
Setting Up Flyte 2 on DGX Spark
Here's how I got Flyte running on my DGX Spark in about 30 minutes.
1. Install Flyte 2
SSH into your Spark and install Flyte:
2. Deploy Flyte Locally
Flyte can run in a lightweight local mode for development, which is perfect for a single-node setup like the DGX Spark:
This spins up a minimal Flyte control plane with a SQLite database and local blob storage—no Kubernetes required.
3. Configure Your Environment
Create a `config.yaml` pointing to your local Flyte instance:
By default, this will create a config file in `./.flyte/config.yaml`. Now you can run workflows from your laptop while execution happens on the DGX Spark:
Solving My Pain Points with Flyte 2
Let me walk through how Flyte 2 addressed each of the challenges I mentioned.
Pain Point 1: Local Development Experience
With Flyte, I write code in VS Code on my laptop (configured via NVIDIA Sync to use the Spark as a remote backend). I run `flyte.run(...)` locally, and the execution happens on the DGX Spark. No manual SSH tunneling for every experiment.
Pain Point 2: Experiment Tracking Without the Chaos
Flyte automatically tracks every execution with:
- Immutable versioning: Each task version is content-addressed
- Full input/output lineage: Every run records exactly what went in and what came out
- Execution history: Browse all past runs in the Flyte UI
No more `model_v2_final_FINAL.pt`. Instead, I query for runs:
Pain Point 3: GPU Metrics Per Run
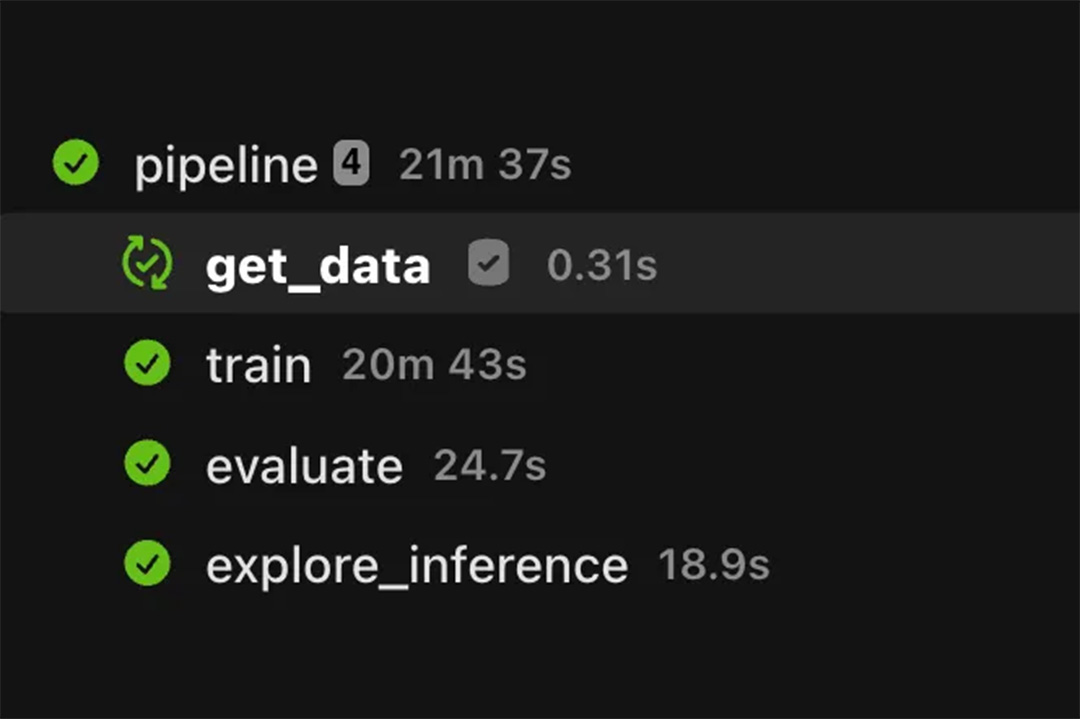
Flyte 2 introduces traces—function-level checkpointing with full observability in the UI. Combined with the DGX Dashboard's metrics, I can correlate GPU utilization with specific code execution:
The `@flyte.trace` decorator creates automated checkpoints that appear in the Flyte UI, showing exactly when each epoch ran and how long it took.
Pain Point 4: Caching Tedious Preprocessing
This is where Flyte really shines. By adding caching to tasks, I never re-run expensive preprocessing when only my training code changes:
With `behavior="auto"`, Flyte generates cache keys from the function's source code. If I tweak the learning rate, only `train_model` re-runs—`tokenize_dataset` hits the cache.
I can also implement custom cache policies for more control:
Pain Point 5: Checkpointing Long Training Runs
Flyte 2's trace system provides automatic checkpointing at the function level. If a task fails, the workflow can recover and replay from where it left off:
If my training crashes at epoch 47 of 100, I don't lose everything. Flyte's trace system lets me resume from the last successful checkpoint.
Bonus: Serving AI endpoints and apps
Once you’ve fine-tuned a model typically ML engineers need to reach for other tools to serve their model on their infrastructure. With Flyte 2, you can use AppEnvironments to easily deploy and serve apps: anything from Streamlit apps to vLLM apps. In the code snippet below, I configure and serve the Gemma 4 31B model using VLLMAppEnvironment.
Then, I can serve it with
A Complete Example: Fine-Tuning on DGX Spark
The code example of how to fine-tune an open weights model on DGX Spark is available here.
The Result: A Real ML Development Environment
After setting up Flyte 2 on my DGX Spark, my development workflow transformed:
- Write code locally in VS Code with full IDE support
- Run `flyte.run()` from my laptop
- Execution happens on the Spark with full GPU utilization
- Track everything in the Flyte UI—inputs, outputs, metrics, timing
- Cache preprocessing so experiments iterate quickly
- Checkpoint training so long runs are resilient to interruption
- Reproduce any experiment by re-running with the same inputs
- Serve AI models and apps using Flyte apps
The DGX Spark is genuinely impressive hardware. It delivers sustained throughput without thermal throttling even under full load, and the 128GB unified memory lets you prototype models that wouldn't fit on consumer GPUs at the same price point. But hardware is only half the story.
Without a proper workflow layer, that beautiful piece of engineering becomes an expensive SSH target that comes with a lot of manual configuration to turn it into an AI/ML workstation that follows best engineering practices. With Flyte 2, it becomes a genuine AI development platform—one that brings the practices of production ML (versioning, caching, checkpointing, observability) to a device that sits on your desk.
If you're running a DGX Spark (or any local GPU setup) and find yourself drowning in experiment chaos, give Flyte 2 a look. The pure Python API means you can start with what you already know, and the production-grade features are there when you need them.
The DGX Spark is available from NVIDIA and partners like Acer, ASUS, Dell, and HP. Flyte 2 is open source and available at github.com/flyteorg/flyte-sdk. Union.ai is the ideal place to start using Flyte for enterprises.The documentation referenced in this post can be found at union.ai/docs/v2/flyte/user-guide.
Have questions or want to share your own DGX Spark + Flyte setup? Find me on Twitter/X, LinkedIn, or drop a comment below.